5.9 KiB
title: First-time ThinkPad X200 flashing x-toc-enable: true ...
This guide is for those who want libreboot on their ThinkPad X200 while they still have the original Lenovo BIOS present. This guide can also be followed (adapted) if you brick your X200, to know how to recover.
If you have the original Lenovo firmware running, you will need to take the keyboard and palmrest off so that you can access the flash chip, which is just underneath the palm rest. You will then connect an external SPI programmer, to re-flash the chip externally while it is powered off with the battery removed.
NOTE: This guide only applies to the regular X200. For X200S and X200 Tablet flashing, please read other guides available on libreboot.org.
Flash chip size
Run this command on x200 to find out flash chip model and its size:
flashrom -p internal
MAC address
Refer to mac_address.md.
The procedure
This section is for the X200. This does not apply to the X200S or X200 Tablet (for those systems, you have to remove the motherboard completely, since the flash chip is on the other side of the board).
Gently push the keyboard towards the screen, then lift it off, and optionally
disconnect it from the board:


Disconnect the cable of the fingerpring reader, and then pull up the palm rest,
lifting up the left and right side of it:


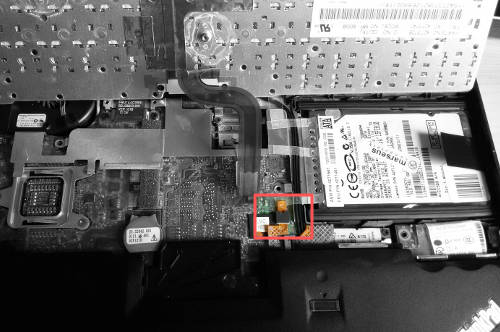
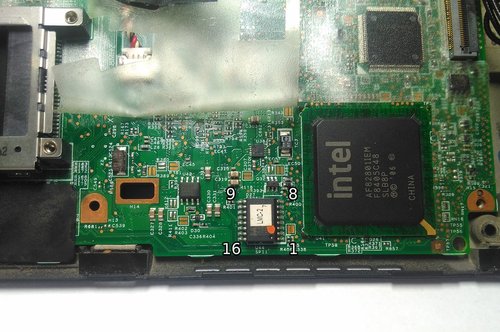
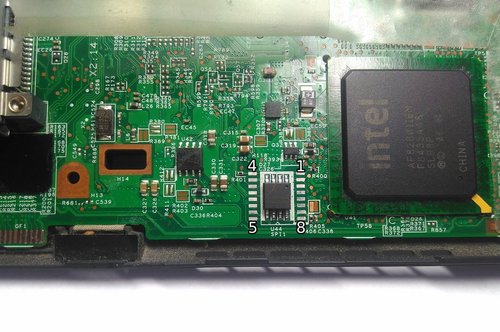
This shows the location of the flash chip, for both SOIC-8 and SOIC-16:


Lift back the tape that covers a part of the flash chip, and then
connect the clip:

Now, you should be ready to install libreboot.
Refer to the SPI programming instructions.
When you're done, put the system back together. If it doesn't boot, try other RAM modules because raminit is very unreliable on this platform (in coreboot).
Memory
In DDR3 machines with Cantiga (GM45/GS45/PM45), northbridge requires sticks that will work as PC3-8500 (faster PC3/PC3L sticks can work as PC3-8500). Non-matching pairs may not work. Single module (meaning, one of the slots will be empty) will currently only work in slot 0.
NOTE: according to users reports, non matching pairs (e.g. 1+2 GiB) might work in some cases.
Make sure that the RAM you buy is the 2Rx8 configuration when buying 4GiB sticks (In other words: maximum of 2GiB per rank, 2 ranks per card).
In this photo, 8GiB of RAM (2x4GiB) is installed:
Boot it!
You should see something like this:
Now install GNU+Linux.
X200S and X200 Tablet users: GPIO33 trick will not work.
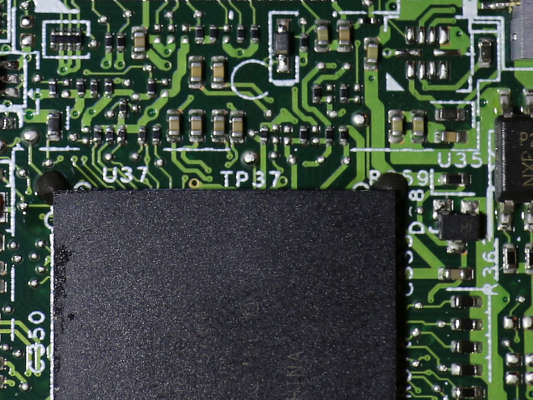
sgsit found out about a pin called GPIO33, which can be grounded to disable the flashing protections by the descriptor and stop the ME from starting (which itself interferes with flashing attempts). The theory was proven correct; however, it is still useless in practise.
Look just above the 7 in TP37 (that's GPIO33):
By default we would see this in lenovobios, when trying flashrom -p internal -w rom.rom:
FREG0: Warning: Flash Descriptor region (0x00000000-0x00000fff) is read-only.
FREG2: Warning: Management Engine region (0x00001000-0x005f5fff) is locked.
With GPIO33 grounded during boot, this disabled the flash protections as set by descriptor, and stopped the ME from starting. The output changed to:
The Flash Descriptor Override Strap-Pin is set. Restrictions implied by
the Master Section of the flash descriptor are NOT in effect. Please note
that Protected Range (PR) restrictions still apply.
The part in bold is what got us. This was still observed:
PR0: Warning: 0x007e0000-0x01ffffff is read-only.
PR4: Warning: 0x005f8000-0x005fffff is locked.
It is actually possible to disable these protections. Lenovobios does, when updating the BIOS (proprietary one). One possible way to go about this would be to debug the BIOS update utility from Lenovo, to find out how it's disabling these protections. Some more research is available here: http://www.coreboot.org/Board:lenovo/x200/internal_flashing_research
Of course, it's likely that the Lenovo BIOS is checking for some bit in memory that tells it not to disable flashing, and then it won't set PRx registers. The way the Lenovo BIOS updater works is, it is executed in Windows first and then a reboot happens, triggering the re-flashing to happen during early boot. It is probably setting something in memory and loading the ROM, plus a payload program that does the flashing; Lenovo BIOS then probably sees that and runs that, instead of setting PRx and going for normal boot. It is theoretically possible that we could discover how this works, by debugging the Lenovo BIOS update utility (in Windows), and then replicate what it is doing, with some tool for GNU+Linux, then load a flashrom binary into memory and the ROM to flash (for the BIOS region). You would do this with GPIO33 grounded, and the payload program would actually flash the entire chip, with just a normal Libreboot image.
It's possible. The above is likely the only way that the Lenovo BIOS updater program works. So if we discover precisely how to do that, then you could just connect some pogo pins to ground GPIO33, then boot up, run some software (which would have to be written) that does the above.
On a related note, libreboot has a utility that could help with investigating this: ich9utils.md#demefactory


